Gamemastering with Airtable
In this in-depth primer Erwan runs through how he manages campaign prep using the Airtable app in conjunction with Node-Based Scenario Design.
Guest post by Erwan Roudaut
As a tabletop RPG developer I interact with our community every day, which often leads to things like giving advice on how to play a specific type of character, suggesting how to interpret certain scenes from our published adventures, or becoming a “Plot Doctor” for some of the GMs in the community. One of the things I like the most about being a plot doctor is that it makes me think about the mechanics hidden behind our favourite hobby.
I firmly believe that Game Masters are fantastic people. I mean, as a developer they are definitely our favourite people, because without a Game Master to run your game there are no tables, so you need to nurture this fan base to make sure they keep loving your game. Another reason I think they are amazing is because the role requires a set of very diverse skills, such as improvisation, creativity, writing, memory, public speaking, and understanding complex game systems. The list goes on.
Node-Based Scenario Design
So, in my time dealing with them, I’ve had the chance to explore various bodies of work surrounding scenario writing and plot preparation. This led me to one of my favourite essays ever: Node-Based Scenario Design, written by Justin Alexander, aka The Alexandrian. I highly recommend reading it before continuing with this article. However, if you don’t have the time to go through this nine-article series, then here is a summary of its contents: Justin highlights the major flaws of the “Plot Based Scenario” design — the approach we, as developers, are almost forced to take when publishing adventures — and introduces a new system that aims to remove railroading from an adventure. He also reuses and develops one of the core rules for any tabletop RPG, the Three Clue Rule, which states:
For any conclusion you want the PCs to make, include at least three clues.
Justin introduces the inversion to this rule, which then becomes the core element of a “Node Based Scenario.”
If the PCs have access to ANY three clues, they will reach at least ONE conclusion.
I think I read these articles a dozen times in the past few years, but it started resonating in a unique way right after I started using what has become my favourite website ever: Airtable.
Airtable is database software. I know, it sounds frightening said like this, but basically it is the perfect combination between your traditional spreadsheet and any project management system you would see in a professional environment. Airtable’s flexibility and power resides in the ability to connect all of your information between several spreadsheets shared in one single database.
Now, you might not see the connection yet, but what occurred to me as I was falling more and more in love with Airtable was that this specific software would probably be the best possible way to create this Node-Based approach in a digital fashion. In the past when I tried using this approach I ended up with long Google Docs files, where information was hard to logically organise. Was it better to organise based on specific plots, or based on locations? How can I properly see the timeline and the way elements are tied to one another? Airtable answered this.
Today I’m going to show you how I applied Justin Alexander’s method to Airtable, and why I think it is the best tool to accompany your tabletop roleplaying experience. I’ve also created a template, which you can download below, to try it out yourself while I go through its structure.
Let’s start with Airtable.
Airtable
First, make an account, which you can do by clicking here. Airtable is hosted entirely on the cloud — so you don’t have to download anything to use it. Enter your email and create a password to sign up.
Airtable has both paid and free options; choose whichever one of those you want to use. I personally have chosen to use the Pro version, because I also use the software in my work, but the free version makes for an excellent start as it comes with unlimited databases, 1,200 records (items you can keep track of) per database, 2 gigabytes of attachments, and a revision history going back two weeks.
There are hundreds of templates to pick from, designed for all kinds of specific needs. As I mentioned earlier, I have created a template specialised for RPGs for you to use, which will feature all of the elements I talk about in this article.
The Airtable document looks and feels just like a normal spreadsheet — you can add and customize fields as you please — but there are some added features:
- In Airtable, your rows are called “records”, while your columns are called “fields”. Each field can be personalized to contain a specific type of information, like a date, attachments, or even numerical values.
- Adding or changing a record works like a spreadsheet in Excel or Google Sheets, all you have to do is click into it and do what you need to do.
One of my favourite features is you that can link and create relationships between tables, or records. These links are the bread and butter of Airtable as it gives you the opportunity to access almost any information from anywhere else by just linking records together. This avoids having to go back and forth between tables, and keeps each one of them dedicated to a specific purpose.
Finally, you can set up views for each table. This means you can group records by a specific field or filter them based on a value, and save the particular filters and groups saved in a view. You can then swap between various views to focus on specific aspects of your database.
Now that I have given you a quick tour, let’s jump to my own beloved RPG Framework.
The Airtable RPG Framework
CHARACTERS TRACKING
The first table is also one of the most important: CHARACTERS TRACKING. This is where all of the information about your NPCs is gathered, such as their name, their allegiance, plot threads that lead to them, or clues they can give your players.
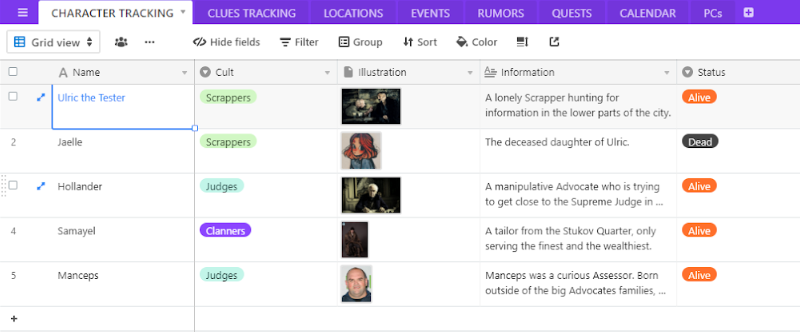
As mentioned earlier, a table is composed of fields (columns) and of records (rows). In this particular case, each record will be one of your NPCs, and each field will include one specific type of information.
Let me guide you through this:
- Name – This one is pretty straightforward. You can put the name your NPC is known by. Nothing tricky here.
- Cult – This one is specific to Degenesis, but the name of the column can be changed to any kind of organization existing in your setting. If you were playing Vampire for example, it could be the Clan of your NPC. In D&D, it would be any major group an NPC could belong to. This is a way to quickly identify where the allegiance of a character lies.
- Illustration – Very easy, here you can drop any picture that would illustrate your character. With the Free version of Airtable you can upload up to 2Gb of attachments so if you play it wisely you can easily manage to have illustrations for all of your NPCs.
- Information – While I would never put a full backstory in this specific field, this is where you can put any relevant details or a short summary for an NPC. I use this as a quick reference for the broad details of a character’s personality or history.
- Status – Dead or Alive. This one is useful for long campaigns.
- Goals – I distinguish between Goals and Motivations because I believe two people can have the same objective but different reasons for wanting to accomplish it. The Goal is the obsession the character has; what are they trying to achieve? It can be long or short, but I find it more useful when it is limited to one sentence.
- Motivations – What is driving the character to complete his objectives? Revenge? Ambition? Money, or Honor? There can be many different motivations, and I believe each character should have different ones to keep things interesting.
- Aliases – What are the other names the character is known by? Do they have a double life where they are a gentle tanner by day and a famous masked dancer by night? Or perhaps the character has acquired a heroic title through incredible feats during a campaign?
We now enter the territory of the Linked Fields, which means that the content appearing hear links to another record, which is potentially on another table entirely. This is where the magic of Airtable kicks in, because each link will guide you to another record with its own information. Without further ado, let’s begin:
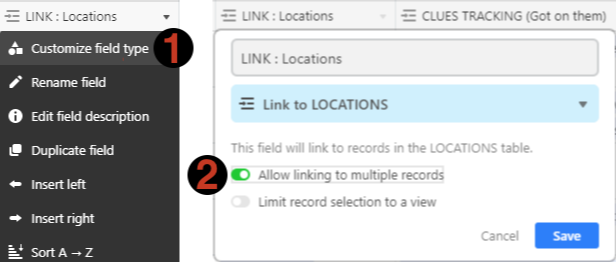
- Locations – I believe that every character should always be located in a specific place. Whether it is a general area like a particular neighborhood, or a specific building like a bar, their headquarters, or their personal domain, the Locations Field allows you to note this down and keep all the information about this place in another record. This means that you don’t have to copy/paste the description of the place every time the character is located there, and any updates to the location will be carried through to everyone associated with it. If, for some reason, a character commonly moves back and forth between different places, you can link multiple records in this field. To do so, clock the small arrow next to the title of the field, then go to “Customize field type” and toggle on “Allow linking to multiple records.”
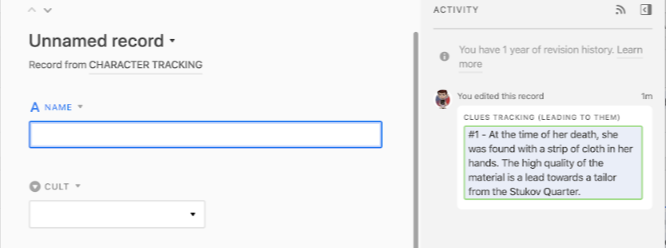
- Clues, got from them – This field links to the Clues table, and defines the information that the character can give to the PCs. I go further in depth on how clues are used on this framework in the next section, but the basic idea is that every bit information a character knows about should appear on this field, which will allow you to quickly understand what they are knowledgeable about, and also what they’re clueless about.
- Clues, leading to them – The exact opposite of the previous section. In Justin Alexander’s node-based scenario concept, it is necessary for every node to give and receive traffic. What this means is that if a character gives a clue about some plot thread, there also needs to be a clue leading to this character. That’s what this field is for — ensuring you have enough clues leading to each node.
- Events – This field is for any main event that a character can be or is involved in. While I rarely use this field, it is still useful to see at a glance which characters are involved in any specific event. However, it does have the issue of it being a node that hosts other nodes; an event will likely be made of a location and will require characters to bring it to life, and each one will also have its own clues leading to and from it. It is the hardest thing for me to use in this framework, and the field that is the most likely to need either deletion or a rework.
- Calendar – Last but certainly not least, the calendar is one of the most important aspects for any GM, as it is a timeline that gathers all major actions relevant to the plot. A timeline can be as simple as a list of major events, or as granular as the actions taken minute-to-minute by a character. In this specific table, the Calendar field is just a link to the record that helps you know several things: when and where a character was featured in a scene, and what are the next actions planned by the character? I usually rule that if actions are planned and the PCs don’t somehow interfere with them, the actions go ahead without interruption. This field allows me to easily keep track of this.
- Quests – An optional field that links to the Quests table. Personally, I don’t use it often despite it being something I had in mind ever since I designed the framework. The reason for this lack of use is that the clue system already gives enough information on every character’s main plotline. However, when playing a large scale campaign with many different threads woven together, I do believe it could be essential.
CLUES TRACKING
Now we enter my favourite area of the framework. This is where you will discover if your stories are well designed, and if you have provided enough information to the players to allow them to understand your plot.
Despite the importance, this table is much lighter than the previous one due to the less granular level of detail. Let’s get into it.
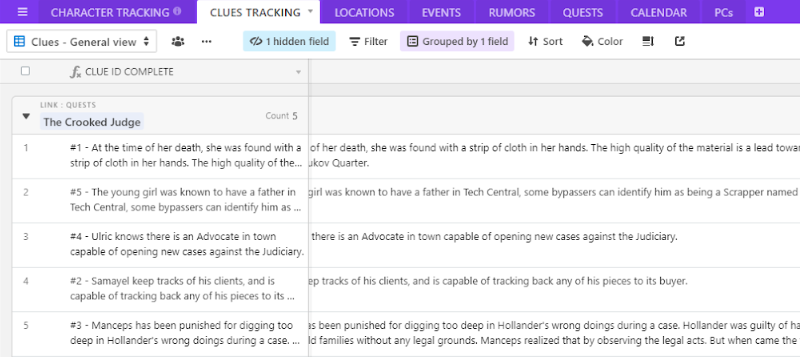
Here is how it works:
- CLUE ID COMPLETE – This field, which is automatically computed, attributes a number to a clue and takes the text from the clue itself to name it. It’s a way to get things organised, and to be able to see the beginning of a clue when it is placed in another table.
- CLUE – This is the core of this table. Here is where the actual information about the clue is entered. I personally try to keep each clue as explicit and easy to understand as possible, as I can’t predict what level of stress I will be in when I need it, nor how well I will remember what my intention was when writing the clue. I recommend that anyone using this table follows this as well; you don’t want to get lost while running your game. The only exception to this are clues, such as #3 in the image above, which involve more detailed information on an NPC. What I really like doing to make sure the clue is specific enough is to write it from the point of view of its source. This makes the clue biased according to its provider — which is an important detail to me. If the source is a location, then the clue is of course neutral and unbiased.
- QUESTS – This field links back to the Quests table. While I don’t find it useful for characters, the opposite is true here as I can use this field to group clues based on the plotlines they are connected to. Personally I avoid linking a single clue to separate plotlines, and instead split a clue into two distinct records, to ensure that there is no risk of the clue being removed from the main cluster of information when filtering or grouping records by a linked field.
The next six fields will sound familiar: we linked to them from the first table, and this is where we will connect them to the various records throughout our other tables. I start with all the ways a clue can be obtained, and then all the directions they can lead towards. My suggestion is to always make sure only one value is present in each field. In order to maintain the balance of Justin’s rule, it’s much easier to only have one link coming and going from each clue.
- GOT FROM – This is a pretty straightforward field: who is capable of revealing the information? The link should only lead to an individual here, since the field is linked to your CHARACTER table. If a character has not been created yet when you input the clue, you can do it from here. Just click “Add new record” when you are on the empty field, then add as much information as needed. This will automatically create a record in the CHARACTER TRACKING table, as hinted by the white link indicating where the record is located.
- GOT IN – The same as above, but for all of your locations. The rule of thumb here is pretty much the same. I highly recommend that each clue only leads to one location. If you think a clue is leading to two individual locations, divide them in two. For an example of what this could look like: the Merchant’s office holds all of his letter correspondences. If one of these letters reveals where the most recent caravans have been sent, divide the clue in two. Clue 1 reveals the destination of Caravan 1, Clue 2 reveals the destination of Caravan 2 — although, to your players, this information will be contained in the same letter. This is purely to help you in visualization if you have enough clues leading to specific nodes.
- GOT DURING – This is the least used field in this table, but who knows, maybe it’ll help you! This is where a clue can be connected to a specific event, but more on those when we reach their dedicated table.
- LEADS TO (Character, Location, Events) – These three fields are identical, so I am gathering them under one single description. In the exact same way a clue can only be acquired from a single individual, a clue can also only lead to a single individual, location, or event. Which means that you, once again, have to make sure your clues are specific enough that they can only have one source and one direction.
- RUMORS – If a clue is based on a rumor that an NPC has heard, it can be linked here. More on rumors later, but keep in mind that a clue can be based on one — whether it is true or false. That’s what this field is for.
LOCATIONS
- Name – Be concise as this name will appear on every linked record. If the place doesn’t have a proper name, make sure that your text here is evocative enough for you to remember it. This can also help you keep track of all the locations you want to use, so be sure to use a bit of naming creativity!
- Description – In this field, put all of the descriptions of the place you need. I generally put the first impression the players can get in the top paragraph, which allows me to see it at a glance, then putting further details for if they stay longer or start combing the area for clues.
- Attachments – Include any references you want for your locations. I get most of mine on Pinterest and just stack them all in the appropriate records. I can’t tell you how helpful it is to have a visual source when you want to make your description really vivid.
- Characters Tracking – When a character can be found in a location, they should be linked here. It helps recognize possible connections between two characters if there is a possibility they are sharing the same place at the same time.
- Clues (Got here) – At this point, I hope you know what this field is supposed to be about!
- Clues (Leading here) – Same here.
- Calendar – Again, the calendar field is the perfect opportunity to check when a node is getting involved in your scenario. Each time a scene takes place in a location (which it should always do), make sure to link it.
EVENTS
Events are the hardest element to use for me. I keep it in the framework in case I see a use for it in game, but so far it has not been extremely successful. Here is how Justin Alexander describes them :
Something that happens at a specific time and (generally) a specific place. Although PCs will often be tasked with preventing a particular event from happening, when events are used as nodes (i.e., something from which clues can be gathered), it’s actually more typical for the PCs to actually attend the event. (On the other hand, learning about the plans for an event may lead the PCs to the location it’s supposed to be held; the organization responsible for holding it; or the people attending it.)
An event can then be something as broad as a gathering planned ahead of time, or something ephemeral and spontaneous like an unprompted murder. In the framework, I made an example using the murder of Jaelle — an event from which it is possible to gather clues. In my mind, this event is the starting point of the potential adventure that could be born from the framework. This is where the first clues are gathered.
- Name – As always, be concise when naming this record. It should be clear enough for you so that you don’t have to think about what is hiding behind the label.
- Description – The description of this field needs to be clear enough to describe what the event consists of, and what it engulfs. If necessary, write down what is considered the start and end of the event to make sure you don’t forget it.
- Clues (Got during) – Same as usual.
- Clues (Leading to) – Ditto.
- Starting/Ending Date – This is a link to the Calendar table. An event should always have at least a starting date. If the event is spontaneous and extremely short in time, don’t bother adding an ending date. However, if the event unfolds over several minutes/hours/days, or whatever is the relevant measuring unit in your scenario, mention it in the last field.
RUMORS
This is a mechanic born from Degenesis itself. There is a rumor mill mechanic present in each book that I love and so decided to steal it and implement here, where each character has a chance to acquire some rumors about a region or setting before a campaign begins. This table helps me keep track of rumors that have already been used, who is able to give them out, who has heard the rumors, etc. It allows you to create information that is generic enough to fit almost anyone, and then attribute it to specific NPCs who add their own twist. This is why I said earlier that clues must be presented from the POV of their source.
- Rumor ID– An automatically computed field that takes a generated number and combines it with the rumor itself. This cannot be manually edited.
- Rumors – This is where you describe your rumor. It can be as long or as short as you want it to be, but it should be kept neutral in tone. The difference between a rumor and a clue is that the same rumor can be shared by different people and in different ways. For example, a rumor stating, “There is a new drug in town” can be transformed into a Clue from a specific NPC that makes it “I heard the new drug is called Eterneum and you can only get it on Bull Street!” or “Tempo knows a client who has a source on some of this drug, she’s called Rovi.”
- Threshold – Depending on the system your game uses this field will take different forms, but for the Rumor Mill in Degenesis, rumors are given a level of difficulty measured in Triggers. The more Triggers rolled, the better the quality of the rumor. This is a fairly basic concept that I’m sure can be adapted to any game system.
- Veracity – It’s good to keep in mind that not every rumor has to be true. I can’t remember the essay from which I’ve pulled this idea, but spreading false rumors is an excellent way to nudge people towards interactions.
- Clues tracking – Which clues are based on this rumor? Track them here to know how many times a given rumor has been used.
- PCs – Rumors can be used for more than just creating clues; they can also be given to PCs as they progress through the game. In Degenesis, for example, a PC can make a roll to see how much he has heard about a specific location before arriving there. Rumors are then given in their purest form, neutral and unbiased. However, once they are in the thick of the adventure, they should only receive rumors in the form of clues from the NPCs.
QUESTS
The quests table is very simple. This is where you can place a simple description of an active plot, whether it is something the players are currently following or something ready to be activated. This table is rarely used during a game session, but can come in handy when doing preparations as it summarises all of the ongoing plots of the campaign.
- Name – I try to make them as self-explanatory as possible, even though I don’t use them during game sessions.
- Summary – This is where you describe your plot. The level of detail is heavily dependent on your own needs. I don’t have a single answer, because some quests need more detail than others.
- Attachments – I use this field to link to any document that contains more information about a quest. I don’t think every one can or should be stored on Airtable, and it’s sometimes better to have a separate document — such as a Google Doc — to have your quests broken down in detail.
- Clues Tracking – You know the drill. All the clues related to a quest will appear here. This can let you know if you have provided enough information for your players, but I recommend using the Clues table to check on this in a more granular fashion.
- Characters Tracking – Same here. It’s a nice way to see who is involved in which plot. I don’t have much to add to this as I think it’s pretty straightforward!
- Calendar – This one is a late addition. I realized that if the Calendar is also used to plan NPCs actions, then it might be a good thing to be able to know for which plot line each action takes place.
In the case of my framework, I have provided an example with Jaelle’s murder. There are three actions in the Calendar: her murder, the discovery of her corpse, and the arrival of the Judges. That’s a pretty straightforward case, but if your adventure has several plot lines it can quickly become confusing as you will have several characters acting at different points in time towards goals that are only totally clear during your preparation — and not when you’re in the thick of the game.
This leads us to the penultimate table: the Calendar.
CALENDAR
The Calendar is a great tool, which can be utilized in many ways. As previously mentioned, I use the Calendar to track actions taken by PCs during the game, as well as a useful way to plan the actions of any NPCs relative to their plotlines.
Unfortunately, the Calendar becomes more difficult to use when playing in a fantasy universe, as it only knows the bog-standard Gregorian calendar. This is a bummer, but we’re not playing on World Anvil, so there’s not much to be surprised about.
- ID – As always, it’s just a self-filling field to make each action unique.
- Short title – This should be a condensed summary of the action, such as “Jaelle is murdered.”
- Description – Here you can delve into more detail, either before the game while you prepare your adventure or after the session when you note down what the characters did. What I have observed is that taking notes during the session then integrating everything into Airtable helps me to prepare my next sessions, as I can easily reflect on the consequences of what my players did. My advice for this specific table is to learn to take notes as you play, because as a GM they will be your greatest assets for improving future games.
- Type of event – This a specific kind of data, which I used to give a brief overview of the intended playstyle for the event. Are my players going to be talking to NPCs in conversations dripping with intrigue, or charging into a deadly battle?
- Date – This should be fairly straightforward, although you can add a time field should you want granularity on the order of hours or minutes.
- Characters – Which NPCs are involved in this action, if any? This field could also be duplicated to track which PCs are part of a scene, if you have a lot of them.
- Locations – This is important, since it helps with tracking movement and making sure you know where your major NPCs are.
- Events – This links back to “Start/End of the Event”. If you have a specific event, like a revolution or a party, you can pinpoint which action is considered the start of the event, and which one is the grand finale.
There are other fields that can be used, even though I personally don’t at the moment. For example, it is possible to set up a “Ideal Timeline” which corresponds to the way events will unfold if they remain untouched by the players, then have a “Corrected Timeline” which is how the world evolves based on their actions. This can be done with a “Single select field” and a filter. This idea was based on another part of Justin Alexander’s articles: Don’t Prep Plots: Prepping Scenario Timelines. I don’t personally know how I would do this on Airtable, but I’m sure there’s a way to come up with something ingenious!
PCs
This is the least interesting table, because I don’t connect it to anything but Rumors and it only serves as a way to gather major information on the PCs. I suggest you do whatever you feel is useful with this field: store states, backstories, major information, plot threads, you name it!
Finishing Up
So there we go! I’ve given you an introduction to what I think is the most valuable tool I’ve come across for planning and gamemastering RPGs, and run you through a personal template I’ve found works well after many hours of play. Now, it’s all in your hands. Please take what I have made and rip it apart, and reform it into something new! I’d love to see what sort of cool integrations and tools people create.
Happy Gaming!
Here’s the link again: The Airtable RPG Framework
Ω